Blog Comment Spam – Latest Development?

Ever since I’ve had a blog, I’ve been getting comment spam. Not so much on this particular blog, as it’s not hosted on its own domain, but particularly my new site, http://www.ridehard.co.uk is getting a fair share of it. Apart from the standard comments just consisting of a whole lot of random characters, lately some different ones have been coming along. Now I’m not sure if this is something new, or if other bloggers have already been facing this other type of spam…

Comments usually consist of some reference, attempting to pretend-socialise with the blogger “hey man, …) and then go on to ask some weird and totally unrelated question. Quite ridiculous ones as well such as “what’s the best way to combat a hangover?” Not sure why these spammers think that this type of spam comment will go unnoticed…

All I can say is, assuming it’s an automated script, wouldn’t it make more sense to have topic related questions posted to a blog of the same topic?

Well whatever they’re trying to do, I’m just glad Askimet is doing such a great job at filtering out these bullshit comments….

My new project – Anything to do with Motorcycles

Although it pains my heart to divert people away from this blog 😉 I’d like to point everyone towards a new site I’m working on.

For a few weeks now, I’ve been riding our Honda CB500 (1996 model). And although I didn’t like it that much before, since I’m more of a retro type of person, I’m totally loving it now!

Now I’ve got this idea in my head that while I’m riding it, I don’t want it to look as old as it is. So I’m taking it upon myself to lovingly improve upon what is there, and transform the bike from bland blue and rusty to totally awesome. In order to document this process, and also talk about various aspects of bike travel, custom paint and anything else relating to motorcycles, I’ve started www.ridehard.co.uk . I aim to update that site regularly to reflect my most up-to-date progress on the bike project. So if you’re a biker or just love to see other people get their hands dirty, head over to Hedonist’s RideHard Blog!

A bit cynical – Internet “millionaires” do they really exist?

1127283_golden_money_51I’m sure everyone who has spent a little bit of time searching on how to make money online, has come across some of the greats of internet money making (and possibly a whole lot of rubbish along the way as well!)

Personally, I’m subscribed to Michael Cheney’s newsletter (god knows why), also I’m on Yaro Starak’s list (because he gave out a free ebook for new subscribers) and some other guy as well, Perry Marshall.. I hardly read any of those newsletters. Mainly because they try to sell me seminars and courses worth hundreds of dollars or pounds at any given point. And also because I have this sneaking suspicion that in order to make a lot of money online (especially if you’re trying to earn by blogging!) you need to live and breathe the internet. Content based online-money-making is especially hard. If you cannot churn out new articles every day that capture your audience’s attention, you’re doomed from the start. Unless you have lots of money to hire some content writers to do the hard work for you. And then you have to be social apparently. Build up a huge following on facebook, twitter, myspace and god knows where else. Be nice to people, talk to them, answer their questions, and subtly try to point them towards your site, hoping they will either click on some ads or buy an affiliate product through you.

Not only does this whole thing sound extremely tedious, but unless you’re targeting a market which is profitable and still not overcrowded, or you spend a hell-of-a-lot of money on advertising, chances are you will not attract enough visitors to get Google to send you your first Adsense cheque even.

So why are people still claiming they’re making thousands per day on the internet? Well it’s quite simple to me actually. What do these people usually sell? The one’s that seem to be rich and successful. They’re the ones with the “how to make money online” blogs themselves! They sell their courses and information packs and ebooks. And us desperate saps buy them and that is how they are successful.

The get-rich-online myth is still very much active, many people with limited or no technical knowledge or insight into ecommerce want to start up their own website and earn with minimum effort, in what seems to be a modern-age Wild West. The Internet.

Now the above all might sound very cynical. Hey that’s how I see it though. I’ve been making money either directly or indirectly through the internet for years now. So I know it’s possible to earn with a website. For us mere mortals it might even be possible to eventually survive with just online earnings. But it is NOT possible in my opinion, to make thousands per day or even per week, using content (as the internet gurus tell us “by following your interests and passions) and some affiliate / adsense links! That is just simply bullshit. I’d like to crush this myth once and for all! If you like model railways or remote controlled cars. Writing about your passion and marketing some related products will not pay that mortgage on the Chateau in France you’ve always wanted, while you’re out zipping around in your Ferrari. Hell no! It might give you some pocket money to enjoy perhaps. But here’s the real secret to online millionaires: The only way you can make a LOT of money online, is by marketing the idea that people can make a lot of money online. That’s right! The Internet Marketing greats of today are cashing in. And simply because us morons would like to believe in that ultimate dream of living a 5 star lifestyle just running a few websites about your hobby.

In essence it’s all just a big MLM type scheme. As long as you keep selling the illusion on, you will make money.. but the poor guy at the bottom of the chain won’t have anyone to sell it to anymore once the market is completely saturated.

Bloody Google Chrome! &%*$%£!

So after waiting for two weeks, I get my relatively new Toshiba laptop back from repair (hard drive had bad sectors). They replaced the hard drive, which means it’s a completely blank install of windows, as if fresh from the factory.

I couldn’t wait to get everything back the way I like it, out with Internet Explorer, in with Google Chrome! But it’s not that easy apparently…. upon going to the Chrome website, running the installer as instructed on the page, this happens:

chromeerror

What the hell???

I did a brief search online and found a link for the “stand-alone-installer”. Same bloody thing happens! Google, what’s going on????? Why can’t I have my browser? The last time I installed it was all smoother than a baby’s ass…
*Sigh* How I hate change. All I wanted was for things to get back to normal…

PS. in case anybody suggests that I should click the “Help me fix this” link; it has no useful information on it.

Buying a Motorcycle off Ebay…

If you’re an Ebay addict like me, it suddenly becomes very easy to buy more and more things from there than you would’ve originally planned. But the most important and exciting thing to buy off Ebay is a vehicle (Ok you could buy property or something outrageous like that, but that’s just pushing it!)

In order to introduce the launch of my latest website; http://www.ridehard.co.uk – I’d like to highlight the latest post I’ve written detailing how I bought my motorcycle on Ebay.

Some background info on RideHard ; Since I’m quite interested in all things motorcycles, I started a blog about ’em! I will be describing my first ever attempt of repainting my bike (a 1996 Honda CB500), as well as write about other things that might interest fellow Bikers, such as Motorcycle Travel, Gear and related topics…

Website Usability – Listen up you “revolutionary” designers!

I remember around 3 or 4 years ago, I picked up a big book dealing with Web Design Usability standards. I read through almost the entire one – 1000 pages or more! And I discovered that lots of what was mentioned, I had already figured out through online research, articles and forums I had read through, while trying to keep up to date as a freelance web designer. Nonetheless it convinced me further, that following certain simple rules, will help keep your visitors happy.

The designer in me, loves to see revolutionary design, different ways of dealing with the same concept, whether it’s an information based website, an online shop or god knows what. BUT: when creating our own websites, we must always consider the target audience. And in order to have an idea about what the average website user knows about techie stuff, I always use this rule of thumb:

“Would my mother know what to do on this website?”

My mother (64) , considered very “technical” in her generation; has been working with computers in her job for 30 years. Mind you – as a programmer for the better part of that, coding in COBOL. She is not very aware of online shopping, very wary of giving people her credit card number, in fact – she’s only had one for about 7 years now.

She knows about how to program, because this was taught to her in a course in the 1970s. She doesn’t know what HTML or CSS is. She has no clue how images are created in Photoshop. She will not know the difference between a Flash animation and an animated GIF. What she knows is, there’s a page called HOME, that’s the beginning of the site, and from there, it should be clear what this site has to offer.

So here are a few rules, when designing websites aimed at the “general public” (if you’re designing for the tech savvy elite of web designers and the like, you have a little more to play with though).

  1. Call your homepage “Home”. Don’t get too creative!
  2. The quickest way to get to the “Home” page is by clicking the logo on the top left corner of the website. Ensure that there is a logo there, it also says the name of the site, and it is clickable and sends you to the homepage!
  3. Navigation must be obvious, clearly placed towards the left or top of the site “above the fold”!
  4. Don’t get creative in naming links! My mother should know what you mean!
  5. If my mother cannot find what she’s looking for, there must be a Sitemap, and a Search “above the fold”!
  6. If you use a column based layout, 2 or 3 columns, the right hand column is for ads and secondary information. The first things the visitor will look at is the middle, the top and the left side of a website, if they cannot find what they’re looking for, then they will look at the right.
  7. If it’s an ad, it should look like an ad. (unless you want to trick people). Nothing is more frustrating than clicking on something expecting new information, and ending up on some advertising landing page.
  8. People love the back button. Ensure that it’s functional! Warnings about having to “resubmit forms” are scary to non-tech people and cause frustration
  9. Waiting is a pain. Most people will not enjoy waiting longer than 5 seconds, unless they are absolutely sure it will be worth it! So think twice about using that 1024x768pixel high quality photograph as a background!
  10. A website should NOT start with a flash intro! Many people are in a hurry and do not want a blinking “Loading” screen to welcome them to your site.
  11. Too many flashing and blinking things can give people epileptic seizures. (OK maybe I’m exaggerating, but they’re still annoying)
  12. Anything “below the fold” will be less obvious, and not viewed by a significant number of your visitors. Important stuff goes up top!
  13. Backwards compatibility is a must! My 64 year old mother doesn’t care that IE6 is an ancient monster which should have been slaughtered ages ago! Neither does she bother to buy a new pc with a 1280×960 resolution monitor. (after all, the old 15″ CRT monitor still works fine!), so make sure your site is viewable on smaller screens and older browsers, and at any cost avoid horizontal scroll bars from showing up!

Bacon & Leek Quiche

quiche

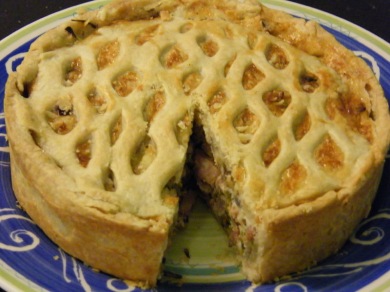
This weekend, I felt the need to do something different. I wanted to eat something I haven’t eaten in a while. Feel the satisfaction of making something special from scratch. So, after having a quick look through the fridge, finding bacon cubes, a leek and lots of eggs, I decided on baking a quiche. My first quiche baking experience was thanks to Odzer, who taught me how to bake a Spinach & Bacon Quiche.

Bacon & Leek Quiche

Pastry:

100g Butter (salted)

100g Flour

Pinch of salt

Put all of the above into a bowl, then cut the butter into small cubes, you may use a pastry blender or whatever you have at hand. It is important that the butter is cold when you do this, you do not want soft butter or your pastry dough will turn greasy!

Rub the butter into the flour, using your index finger and thumb. Keep doing this until the mixture resembles crumbs and both are properly combined. (Don’t leave crumbs of solid butter in there or while baking you’ll get holes in your pastry dough!) Now, add a little bit of water, just enough so that the dough sticks together and holds together while kneading. Knead for around 5 minutes, until the ingredients are nicely combined.

Wrap in foil and keep in the fridge until needed.

Filling:

1 pkt Bacon cubes (250g)

1 leek – sliced

1 onion – sliced

1 tsp Salt – reduce if your bacon is very salty

Pinch of black pepper

Fresh herbs of your choice – I used fresh rosemary, crushed

4 Eggs

125ml Milk

In a frying pan or wok, fry the bacon until it leaves fat and turns golden brown at the edges. Then add the leek and onion, keep frying until all is cooked. Season with salt & pepper and herbs. In a separate bowl, whisk the eggs and the milk together until combined. Season with a pinch of salt and pepper.

Take out the pastry dough and roll it out on a clean floured work surface. The base of the quiche should be approx 1/4 inch thick. Spread a little oil over the pastry case of your choice – either one big one; approx. 6 inches across, or multiple smaller ones. (In case you’re making small quiches, roll the pastry dough out a little thinner. Now line your case with the dough. I used a cake tin; putting a 10 inch diameter round of pastry dough into my 6 inch case. Press the dough into the corners so no air bubbles remain, and make an even edge all across the side of the case, roughly 2 inches in height.

I was left with some pastry dough after doing this, so I kept it aside for using as a lattice top later on. If you followed my pastry dough recipe using 100g butter and 100g flour, you probably have exactly the right quantity for a normal sized pastry case.

In a preheated oven, bake the case empty for approx. 10 minutes, until it starts looking half cooked. You can tell when it’s cooked enough by waiting until the dough is no longer shiny and greasy, but turns matte and a little flaky. Now put the bacon/leek/onion mixture into the case, pour your whisked egg/milk over the top and sprinkle with some grated cheese (optional). If you had pastry dough left over, put it over the top as a lattice shape or however you prefer. Bake at 180 degrees C for 30 minutes, or until the egg is no longer runny when pricked with a knife. Enjoy the quiche hot or cold!

Favicons – or: That little picture next to a website URL

A picture speaks a thousand words – Or at least that’s what people say. And you will have seen lots of websites, that after you’ve opened them, display a little tiny picture towards the left of the website address in most popular internet browsers in use today. And if you run your own site, you may have wondered, how do I get one of those?

Well wonder no more – The picture is called a “Favicon”. And you get one by creating an icon (.ico file) based on an image you design, and putting it in the root directory of your site. So that’s it in a nutshell. Below I’ll go through it step by step.

1. The image
Choose an image or create one from scratch which will look good even when displayed extremely small. If you’re creating this image from scratch, it helps to work on a small scale so you need not resize too much in order to use the icon. Make a new image sized 64×64 pixels. Once it is done, resize to 16×16 pixels and see if you like the look of it.

For this example, I have taken part of a photograph of sunflowers, and selected a square of the original to create this small picture: (64x64pixels)

sunflowers1

Resized to 16×16 to see if it looks acceptable:

sunflowers16

Well it ain’t perfect, but it’ll do for my example.

Next – we need this image to be saved as an .ico file (Windows Icon File). Depending on what software you have access to, you may be able to do it from your graphics program directly (For this example I used The Gimp, which can directly save as .ico, if you’re using Photoshop, you may need to install a plug in). OR: You can simply convert your .png file to .ico using This Very Handy Website. Then rename your file to “favicon.ico”.

2. Your Website

Now that we’ve got the icon, we need to include it in our website. In order to do this, upload it to the root directory of your website. Now most browsers will automatically recognise it. But in order to make sure, include the following code on all pages, within the <HEAD> and </HEAD> tags towards the top of the page:

<link rel=”shortcut icon” href=”http://www.mysite.com/favicon.ico&#8221; type=”image/vnd.microsoft.icon”>
<link rel=”icon” href=”http://www.mysite.com/favicon.ico&#8221; type=”image/vnd.microsoft.icon”>

And done! Now everyone who visits your site (provided their browser supports it) will see your favicon next to the url, next to the title of each page in tabbed browsers (IE7, Firefox, Google Chrome, etc), as well as next to bookmarks.

NOTE (Thank you Odzer for reminding me) : if you’ve done all the above and your favicon is not showing up, empty your cache (temporary internet files), or the change won’t show up. This is because your browser is basically still looking at the files it had previously saved on your hard drive, not the ones you just updated.

A satisfying treat – Egg Parantha’s

It would surprise people, how often Indian food is made at my house – especially since I’m not Indian myself! Although usually comfort food are those things which you have nostalgic childhood memories of, sometimes a dish comes along later on which is extremely easy to warm up to – before you know it it’s high up on your Comfort Food favourites list! One of these dishes for me is Egg Parantha’s. I learned how to make them shortly after moving to India, even though they are not generally a staple of the average Indian home… Maybe they should be though!

So let’s start with what they are – Parantha’s as many of you know, are fried or baked unleavened breads, which generally have multiple layers. You achieve this layered effect much in the same way as with puff pastry; after kneading the dough, you roll it out thin and spread some oil over it, folding it over, repeating this process multiple times until you end up with a square shape. I explained and illustrated this process in a previous post; Spinach Mania – why does it have to come in such big packets? which outlines how to make Spinach or Hara (green) Parantha’s. The process is the same for Egg parantha’s, obviously leaving out the spinach. Then while cooking, the parantha’s are filled with egg (beaten and seasoned like for omelette).

Note: I don’t want to discourage anyone, but this recipe is unlike most of my previous ones – it requires a significant amount of skill to get it right. More often than not do my parantha’s end up half empty! Also in order to feed multiple people, expect to spend some time in the kitchen! That being said, even if they’re not perfect, they’re still tasty!

Egg Parantha – Flat bread stuffed with egg

Chapati Flour (Hindi: Atta)

Water

filling:

1 egg per person – beaten with all seasonings as per below

1/2 tsp Salt

1/4 tsp Red Chilli powder

1/4 tsp Turmeric powder (Hindi: Haldi) – OPTIONAL

Some oil for cooking – in a small bowl with a spoon for convenience

Make a dough with the flour and water; it should resemble bread dough. Not so sticky it will coat your hands, but not tough and dry either. Best is to sift 3 cups of flour into a large mixing bowl, then add water little by little, combining it by hand, until the dough leaves the sides of the bowl and you can knead it as one big ball. On a clean and dry work surface, knead your dough for approx. 10 minutes. Keep it aside while preparing the egg mixture.

Then heat a griddle on the stove, medium to high heat.

Start rolling your first parantha – follow the instructions of my Spinach Parantha Recipe (NOTE: before the first fold, throw a tiny pinch of salt over the oil you’ve just spread on your rolled out dough. This in case the egg mixture doesn’t distribute evenly, at least the empty bits of your Parantha are not bland!).

Put the completed square parantha onto the griddle and cook it at low heat until the colour turns darker, then turn it around and cook the other side until the layers of the parantha start to separate and fluff up. If need be, gently press it from the sides to build up pressure inside which makes the layers fluff up completely, without leaving parts of the parantha flat. This is something which will take some practice, skill, and/or talent!

Take the griddle off the flame and pick a side of the parantha where the layers are recognizable; separate the top and bottom layer from one another. Quickly pour 4-5 tablespoons of the egg mixture into the parantha, trying to make it spread evenly on the inside. Press the opening together to close the parantha again.

Put the griddle back on the flame. Quickly spread a teaspoon full of oil along the sides of the parantha so it gets poured underneath. Also spread a little bit of it with the back of the spoon along the edge where you cut your parantha especially as well as over the top of the rest of it. Turn the parantha over, taking care not to spill the egg. Cook it until the egg inside fluffs up and remains firm (that means it’s cooked).

Repeat process for remaining paranthas – those who are really skilled can roll another parantha while the previous one is getting cooked…

Enjoy hot with some pickle, chutney, or just by itself!

Zen Cart & Google Analytics

If you’re running an E-commerce website, and you are building it yourself, chances are you would be using one of the more popular open source shopping cart scripts; one of which is Zen Cart. Based on the osCommerce framework, it offers a LOT of functionality, as well as a vast selection of third party add ons to suit the needs of most small businesses.

Although to most Zen Cart powerusers, this topic is probably hardly a big deal, however, for all you newbies out there I would like to talk about an add on for Zen Cart that is very valuable indeed. The Google Analytics addon. We all know it is absolutely vital to know what is happening with our online businesses. We need to keep track of how profitable it is, and whether our (if any) advertising efforts are paying off. By signing up to Google Analytics, and linking your Google Adwords account with your Analytics account, you can trace what your paid traffic is doing. But in order to make the most of Analytics, you should implement Ecommerce tracking. Doing this is a pain, especially if you do not have much programming experience. Even more so if you’re using a shopping cart like Zen Cart.

But this Google Analytics add on, which is fairly straightforward to install, will do exactly what you want. Having just installed it on my two websites; www.alteregouk.com and www.aelingerie.com ; I managed to test it and must say it works brilliantly. It tracks transactions completed through your website; depending on what payment modules you are using, it will be fairly accurate. Obviously if you accept COD or any other form of offline payments, it will be impossible for Analytics to find out whether or not the transaction was actually completed – therefore I would suggest using this data only if your transactions are just online (such as through PayPal, Nochex or some other credit card processor).

« Older entries